Posts

Showing posts from January, 2011

A familiar tale of woe

Image
Brands Hatch... There was some speed, followed by a mechanical failure, then some more speed... Then there was another more serious mechanical failure, leading to ABORT MISSION shortly after lunch... Yes, it's the traditional Brands Hatch head gasket failure.  Perhaps I should have bought new head bolts.  Anyway, it still managed to get me the 80 miles home and with only 1 coolant refill.  Up to that point the car had been excellent, the new brakes were completely untroubled and the straight-line speed is better than ever.  Locke-alike kindly gave me a passenger ride in his supercharged car.  His Federal RSR tyres are in a different league to the Toyo T1R, they're my new favourite tyre and I want some. I had the pit crew with me on this occasion, it was very welcome as it was extremely cold.  Mrs B attended the driver's briefing, and now she's considering doing Bedford Autodrome.  I wonder if she wants to learn how to fix blown head gaskets?
AEM UEGO wideband O2

I've ripped out the dead LC-1 and replaced it with the AEM version.  It comes with a pretty AFR gauge, that handily fills a hole next to the boost gauge, and it was easy to install; there are just 4 leads to connect (live, earth, serial (not used) and the 0-5v linear output for the Megasquirt).  There's none of that pesky free-air calibration nonsense you get with the LC-1 either.  I had a spot of bother at first because the gauge was showing a different value to the Megasquirt output.  Eventually I discovered the fix; in TunerStudio , go to Project Properties and select the WB02 sensor as a AEM 3-400 gauge (not AEM UEGO ).   Brakes have been a damn nuisance.  I 'd noticing I was losing a little fluid, and suspected the NSF caliper so rebuilt it with new seals.  During bleeding I noticed fluid dripping from the underside of the car, turned out the front/rear pipe was leaking at the master cylinder!  I nipped it up a bit tighter and it's OK now.  Sounds easy, but duri

Stop. Full Stop.

Mazda is back in daily use, and the brakes so far are PREMIUM EXCELLENTO.  They're like the brakes you get on proper cars, they make the car stop when you want, every single time.  I just need some wheels that keep going in the direction they're pointing now. The brakes took quite a bit of bleeding and still the pedal felt quite soft.  I was quite fed up with it being garage furniture though so took it for a drive anyway, and within a few miles they were much better.  A couple of hundred miles later and they're excellent.  The nearside front was initially binding, but a new bottom slider bolt sorted that out.  The LC-1 wideband O2 sensor is officially dead though, thinking about getting a different make to replace it.

Upgrading to 1.8 brakes

Image
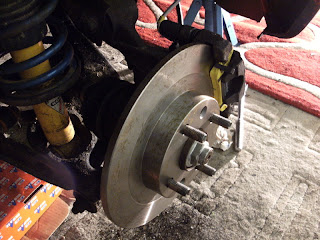
Being a '91 car, I've been struggling with the little 1.6 brakes for too long.  They're acceptable on the road (assuming you're not going too crazy), but combined with turbo power they soon start spoiling the fun at track days.  So, I've upgraded to the larger brakes found on the later 1.8 cars. To do the conversion, you need 1.8 discs, pads, and caliper carriers.  The latter came from a breaker (£70 for front and rears, note that you need the pad fitting clips for the rear), the rest new from MX5Parts again.  It's very straightforward work, you remove the calipers, discs and carriers, then match up the carriers with the 1.8 ones.  Use some threadlock when fitting them, tightening the 2 bolts to around 48nm. The brake backplates then need to be modified to keep them clear of the larger discs.  The fronts are easy (the edges are easily bent outwards using pliers), but the rears are much more awkward and ideally you want to cut off the edges with tin snips.  

Replacing brake pipes, part 2

Image
All of the brake lines are in now, but it was a HORRIBLE JOB.  I had to chop the front-to-rear pipe into 3 pieces to remove it because I didn't want to attempt to remove the tabs securing the pipe runs to the chassis rail (see photo).  I slid the new pipe in from the engine bay, and had to improvise the routing at either end.  All of this was done in a shower of muck, much of which was magnetically attracted to my beautiful eyes, despite the fact that I'd pressure-washed the underside last week. (click photo for bigger version)

Replacing brake pipes, part 1

Although the brake pipes themselves are sound, the unions are heavily rusted and disintegrated when I recently attempted to replace the flexi hoses. The only real solution is to replace them, using a kit I got from MX5Parts .  Replacing the fronts wasn't too bad; the routing is quite convoluted and it was a bit difficult to get them out without bending them (I wanted to copy their shape exactly), but it was done within a couple of hours. I had to cut the old pipe ends. I bent the new pipe over a screwdriver grip, to get smooth radii. The rear pipes are proving more difficult.  There's a single pipe from the front to the offside-rear wheel, which goes into a distribution block from which the NSR brake is fed (this block is an integral part of the rear flexi hose). The pipe is routed through clips along the chassis rail, along with the fuel feed/fuel return/tank breather lines. Unfortunately, the bolts holding the clips are heavily rusted and will most likely shear if I try to